Diffuse the Situation

Hello my fine curly-headed friends! It’s been so long, and for that I apologize. I’ve been buried in books, papers, horses, kids, and classes for the past four months and have finally been able to come up for air. My hair is also ready for some action and is getting a trim today because it’s turned into a proper nest over the past few neglectful months.

Although I haven’t yet posted about my wedding hairstyle, I wanted to pop in with a quickie about diffusers. We are now entering the winter months in the good ol’ US of A and in other places around the world, so that means less going outside with wet hair and more going greasy due to a strong desire not to get wet and chilly. It’s still important to maintain appropriate hygiene, and let’s remember that pulling hair back into a ponytail or bun every day causes breakage, which means split ends and lackluster locks.

As always, there is an answer. I’ve used two types of hair drying diffusers myself and there is a new gal on the scene. Let’s examine them, shall we?

Old Reliable*

oldreliableThis friendly reminder of childhood and Mom’s 80’s hair tools is a true blast from the past, but it is still relevant. This diffuser isn’t so much designed for the average curly-haired user, but for anyone who wants to dry their hair without frizzing it to high heaven while still adding some volume.

Pros: It gets the job done, hair will dry. Curls do not separate and spazz out the way they would with a “naked” hair dryer.

Cons: It does not target the roots of the hair, meaning that getting that fully-dry feeling takes longer and comes with the consequence of additional heat damage and agitation to hair follicles. It also doesn’t do the greatest job of diffusing airflow, and will cause some curls to separate and some frizzing to occur. It also creates major drama — think 80’s glamour girls and guys. Not everyone is into that, but if you are, rock on, gorgeous!

Buy it at Drugstore.com or in most hair product retailers.
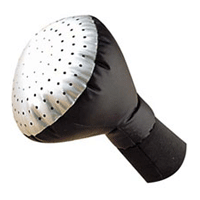
The Thing*

thethingThis Devachan creation looks scary and may frighten a significant other if you leave it hanging out in the bathroom on its own, without the context of an attached hair dryer. This may be seen as a bonus.

Pros: This lovely lady was designed to target roots and decrease frizzing and volume, which is fantastic. Just because we have to blow-dry our hair doesn’t mean we want it looking puffier than when we let it air dry, am I right? Devachan’s model works really well when you are in a rush because you can cut straight to root drying for warmth and leave the ends to dry on their own. You can use the “hand” to either push curls up for volume or just hold it in your hair while curls dangle freely while being dried in a relaxed position. It’s also great for adding volume at the roots.

Cons: While it comes with many improvements, this diffuser does not necessarily cut back on frizz as much as I’d like. My short top layers get blown this way and that, creating a frizzy, unpolished look. This is fine when I am up for it, but I’d like to have a little more control over the air flow.

Buy it at Amazon.com or in any of Devachan’s locations.

Wind Bag*

windbagI’ve only become aware of this diffuser recently. I don’t have a full analysis on it because I have not used it myself. However, a friend has said that it’s awesome and works really well at controlling airflow and limiting flyaways. I’d probably use it in conjunction with The Thing* because it doesn’t look like it would get at the roots as well. If you’re looking for something to send me for Christmas, look no further!

Buy it at Hair Beauty Bargain Bizarre.

All three of these are pretty much universal and will fit any standard dryer. Also, it goes without saying that you use a diffuser because you’re not drying with the controlling aid of a brush. I didn’t have to tell you that, though. Have you tried any that aren’t on this list? Have anything to add**? Please leave feedback in the comments below! Stay warm my fuzzy friends, and take care of yourselves.

* I made up all of these names for your reading pleasure.

** Like this one?!

Oil Slick

Hello dear readers! It’s been a while. I make a point of only posting when I have something truly worthwhile to say, so I apologize if you’ve been feeling neglected.

olive-oilI’ve come across a slew of timely new products that don’t seem to be a total waste of money and are worth the investment: Easy-to-use hair oils. They come in many different brands and consistencies with a plethora of ingredients and application techniques that offer various benefits to hair and styling. I’d feel remiss if I didn’t mention that this is not a “new hair trend” by any means. Go to the small but super important “coarse hair” section of any drugstore and you’ll see products similar to these that have been on shelves for decades. This bevy of new contenders just comes in prettier packaging with highly-marketed branding, and the oils tend to be a bit more distilled so that they don’t weigh down finer hair types.

seaspongeThe first thing you should know is that the coarser the hair, the bigger the “pores,” and the more moisture that is needed. Think of hair porosity in terms of a big sea sponge with huge divots. The holes of the sponge are big so that they can absorb a ton of liquid easily, but the water also squeezes out more easily than it does in a more condensed sponge. Hair is this way too — if it thirstily absorbs everything you put on it, it loses moisture just as easily.

Below I’ve broken down a few that I’ve tried, which I’d recommend based on hair type, and how to use them. But first, a few ground rules.

1) Concentrate on strand ends when using oils. The ends don’t get as much love from natural scalp oils, especially on a curly head, and this is a big part of what causes split ends. And don’t shortchange your shorter layers — they have ends too!

2) Just because a product says to use it on wet or damp hair only, this doesn’t mean it’s a hard and fast rule. Hair absorbs more when it’s not wet — this is common sense. When it’s wet, it has already absorbed some water. When it’s dry, it’s only absorbing what you put on it. If your ends are feeling very dry, I’d definitely recommend using oil on them when hair is not wet.

3) Regardless of what some packaging may claim, hair oils are not a replacement styling product. They can be, if you’re ok with a slightly less tame hair day, because they will not hold curls together in a cast while they dry the way gels, mousses, and creams do. For an everyday look, you should probably expect to wear hair in a braid or bun that day to hide the greeeez.

4) How much you apply depends on when you are using it. Refer to the point above. I don’t style with oils on the “first day” of a hair wash cycle. Usually it’s when I go on to a third or fourth day that I start to feel like it’s a bit dry from days without conditioner. However, with very light application, and with a lighter oil mix, you can get away with running a bit over your gelled hair without greasy side effects. We also tend to wash less in the winter, and that’s when hair needs moisture the most. You will not use oils as much in the summer, but they are a great little product to pack in the beach bag for use after chlorine or saltwater abuse!

5) Your scalp can also benefit from oils. Itchy? Painful? Flaking? All of these can be side effects of a dry scalp. Not everyone gets dandruff, and dandruff is not the only indicator of a scalp in distress. Even if you have one spot that seems especially painful, rubbing a dab of oil or conditioner on that spot will soothe it instantly. It’s like magic. So if you’re already applying it to your ends, why not go all the way? But beware — this is an application site that will make hair look pretty greasy and you may not want to do it just before stepping out for the evening or heading to work. On the weekend? Cover up the evidence with a cute bandana or hair scarf.

6) Why not just use the EVOO in my kitchen cupboard? Ahh, the million dollar question! You can do that if you spruce it up with lots of yummy-smelling quality essential oils and mix them together before application. Otherwise, you will just smell like a fry cook all day, and you may get sick of that (unless you actually are a fry cook, in which case, go for it!) This is why I recommend the homemade oil treatment as an overnight remedy, not something to leave in your hair during an average day. The products below smell amazing, so any questions regarding your hygiene should be quickly dismissed.

7) Use hair oils as often as you feel is necessary, based on hair’s absorption. There is no drawback to using them, but if you over-do it you will see that it gets super greasy because it can only absorb so much. Over-saturation serves no purpose! You will know how to toe the line with your hair as you become more accustomed to using oils.

8) Wash with a real cleanser at least once a week when you are using oils. They don’t wash out with water and conditioner like other products and environmental deposits do. Because of this, you’ll want to treat hair, and especially your scalp if you’ve used it there, to some DevaCare Low ‘Poo, No ‘Poo, Homemade Lemon Juice-Conditioner cleanser, or WEN’s cleansing conditioner during shower time.

9) Start small. A dime-sized dab in the palm will go a long way. My hair is down to the middle of my back and that’s all I usually need, concentrating on ends and mid-length. If you need more you can always add more, but add in very small increments. Rub palms together and rake the oil through hair where it’s needed most.

10) When in doubt, read the ingredients!! Google any that you don’t know and you should get a good idea of how good or bad they are for your hair. Some synthetics can be extra slick, coating strands with more shine than moisture, so it’s best to go with products that have as short an ingredient list as possible.

Now, without further ado…

OjonWandOjon

– Course to fine type –

Ojon’s products come in two super-handy applications for all hair types. The first is in a bottle, and you can use it based on your hair’s absorption power with a dab in your palm that you rake through pretty liberally. If you need more, use it, but start small. The second applicator is like a mascara wand that can be used for flyaways. If you have a ponytail, say, and there are a few baby hairs that just won’t lie down, skim the wand over the trouble spots and they will simmer right down. This also works really well for straight-haired and short-haired ladies and gentlemen with stubborn cowlicks, so surprise your un-blessed friends with your new-found hair-saving savvy!

PalmersPalmers

– Coarse type –

Palmers’ products tend to be a bit on the gooey-er side, and can be used even more sparingly than the others. Coarse is not synonymous with thin — this hair type breaks more easily than all others, so oils are essential and Palmers makes a great product. Just because it comes in a spray bottle, that doesn’t mean you have to use it that way — in fact, I don’t recommend it. With a dab in the palm you are better able to control the amount that you’re using and where it’s being applied.

hask-argan-oil-and-hair-mask-L-oOR53vHask Argan Oil

– Coarse to fine type –

Argan Oil can be found in many product lines now, and with a variety of thicknesses and added ingredients. I like the Hask version, and it smells like a creamsicle. I use it more than any others, and it’s pretty thick so use sparingly and mainly at the ends.

moroccan-oil-treament-25ml-regularMorrocanOil

– Coarse to fine type –

MorrocanOil makes a long line of Morrocan oil products that have been widely circulated through the United States and they tend to stick to sparse, helpful ingredients. Their trademarked original oil is another example of a top notch product without too many unnecessary add-ons.

OrganixOrganix

– Medium to fine type –

Organix Penetrating Oil Renewing Moroccan Argan oil is my newest favorite for my fine hair type. It’s light enough not to look greasy, smells so good, and comes in an easy-application pump bottle. It may not offer enough oomph for coarser hair types.

Winter Shminter: Curls in the Cooler Months

Image courtesy of Etsy.

Image courtesy of Etsy.

Now that the cooler temps and dry air are upon us, at least those of us who live in 4-season climates and are currently experiencing fall’s entree to winter, you will start to notice a few small changes in your hair. Here’s how to deal.

  1. It will look a bit more flat and lackluster. Air – Humidity = less frizz, which takes away the added volume in most curly hair. I say most, because the porous quality of our hair is unique. Typically, the tighter the curls, the more porous the hair. Though, if you’re one of those who are blessed with lots of hair strands, it probably won’t look all that much different. Hair is also a bit shinier without added frizz, so that’s nice.
  2. Artificial heat is also drying, and damaging. Now that it will be too cool to breeze out of the house in the morning with still-wet air-drying hair, you will be tempted to use your blow dryer. May I caution you to use this as little a10favorite-jack-o-lanterns possible? The drying effects will mean that you need to do more deep conditioning and oil treatments, which we all know by now is expensive. A better solution, if you can stand it, is to wash hair at night, let it air dry for about an hour, and then sleep with your hair fanned out above your head and over your pillow. It sounds counter-intuitive to sleep on wet hair, but try it. The hair being lifted at the roots and drying horizontally gives added volume and the hair dries disruption-free in its gel caste, leading to smooth, shiny, defined curls.
  3. You will need less product. Now that we’re not fighting frizz on a daily basis, use less product than you do in the summer. This does not apply to conditioner — your hair always needs conditioner. In the fall and winter months, my styling routine is basically this: Condition heavily, wash out most of it, turn head upside down and scrunch in a dime-sized amount of Deva Curl Angell, get out of the shower, dry it gently with a hair towel, and rake a small dab of a finishing product through hair for added protection against the elements. This can be a creme or another type of gel. I like to mix products, it tends to work better than using a lot of one product.
  4. If you’re growing your hair out — it will look weird. This is just what I am currently experiencing, so I’m sharing it with you. I decided last spring to grow out my bangs, so I’m just letting the whole mess grow out on its own to see how long it can get before I hate it. Right now it’s lying pretty limp and lifeless, but when I use dry shampoo at the roots, it looks pretty magnificent. The main thing that annoys me is the long ringlets that have grown to about 12+ inches (in ringlet form) and make it look like I just have a few rat tails hanging down rather than a full bounty of locks. If you’re comfortable with cutting it yourself, you can take one of these longer curls, split it in half or in three sections, and snip off an inch from one of the sections. Making them slightly different lengths can separate the curls and add volume. Remember: Less is more when self-cutting (bad joke). Take off an inch or less at a time. There’s nothing worse than lopping off 5 inches without having realized; and you can always go back for more.
  5. Condition, Condition, Condition!!! I can not stress this enough. Curly hair needs a lot of conditioning. Try to work in one mask or oil treatment a week, especially in these cooler temps. If hair feels dry, leave some conditioner on your ends. *You do not need to buy leave-in conditioner!* Use the stuff you use in the shower. This applies especially to longer-haired peeps. If hair is shorter, scalp oils have less traveling to do to make it to your ends. If your hair is long, it needs some help in that department. Always wash out deep conditioning masks and oils with equal parts lemon juice and conditioner. It’s the best cleanser out there.

Now bundle up and get ready for scarves, sweaters, and hot cocoa! It’s right around the corner…

Product Update: Curl Creme

frizz-cremeThis past weekend I had the pleasure of partaking in a new hair maintenance product thanks to Sephora samples that were sent to me along with my most recent perfume purchase. (They sent me like, 8 amazing samples, btw. The best two were birthday gifts, but the others were just included in my purchase.) Now, if you’ve been reading my blog, you probably know that, for me, the basics have always been rich conditioner and a hearty gel. I’ve most definitely learned that mousse is not a friend of mine (leaves hair frizzy and sticky), and creams have always left my hair feeling overdone and clumpy.

I decided to try this curl creme sample because I was going for a post-oil-treatment, post-chlorine-and-sun-abuse lazy Sunday afternoon look. I figured it would just give me some nice shine and maybe eventually I’d have to put my hair up when it got insanely frizzy. Friends, I couldn’t bring myself to put it up, even later when I’d gone for a long sweaty bike ride! I don’t know the last time my hair has looked that good, seriously. It was definitely post-treatment too, which made it feel less product-y, but it was above and beyond the norm. I highly recommend it.

Below is how I used: Living Proof Nourishing Styling Cream

  1. Aprés-swim, I used some Devachan No-Poo to rid my hair of chlorine without drying it out even further with a detergent-heavy shampoo.
  2. I saturated my wrung-dry hair with MoroccanOil Restorative Hair Mask, and rubbed it into my scalp. Note: I alternate my treatments so that my hair doesn’t get too used to any one thing. The most effective is the homemade oil treatment, but it’s best to switch it up now and then for maximum benefit. Heavy oils are less needed in the summer months.
  3. I covered my hair with the usual treatment cap, tied it on with a bandana over the top, and went to sleep.
  4. The next morning I concocted the 4 tbsp. conditioner/4 tbsp. lemon juice mixture and poured that over my hair, concentrating on working it into my scalp, distributing it through my hair, and then thoroughly rinsing it all out. You don’t want any lemon juice left in your hair. I used my Aussie Moist conditioner for the cleansing mixture since it’s a decent and inexpensive conditioner that won’t be sitting on your hair for too long anyway.
  5. After rinsing, I applied one more slap of one of my new favorite conditioners, Avalon Organics Conditioner Volumizing Rosemary. It smells like I’m in a spa and works really well in rotation with my other two favorites: Creme of Nature Argan Oil Intensive Conditioning Treatment and Devachan’s One Condition. Again, you don’t want to use the same exact products every day. Rotating products, while keeping one styling product and one conditioner as your staples, keeps hair fresh and moisturized. I always apply conditioner to the middle and ends of my hair while my head is upside down in the shower, and then rinse it out about half way. Wring hair dry with your hands.
  6. I normally add in my base gel at this point, but instead I got out of the shower, toweled off, and raked Living Proof’s creme through my hair in a very haphazard way. Some of you may have noticed before, this is often the beginning of great hair days — not caring! Curly hair definitely has a sense of humor.

Without further fiddling, I let it dry throughout the day, and I didn’t even use clips at the roots for vertical body. It created the most beautiful curls on the hottest and most humid day that I’ve ever experienced in NYC. Zero frizz, my friends. This after a sweaty bike ride, a night sleeping on it, and a spin class the next day. Still going strong and still smelling amazing. This one is worth a try!

My Waterless Week

I’m a strong believer in making lemonade out of lemons — after I’ve stomped on, cursed at, complained about, and otherwise viciously abused those lemons. That being said, when we realized that the boiler in the basement of the old building we just moved into has gone kaput, and will apparently take weeks to fix just as we’re starting to get snow and frigid temps here, I was forced to face some hard truths when it came to my hair.

I feel your pain, little guy!

First of all, who wants to sleep with a wet oil-treated head when it’s freezing in your bedroom? Not me, which doesn’t bode well for my poor wind-bedraggled mane. Second of all, no matter how much I diffuse my curls after washing them, they will always stay wet and I’ll be freezing again within a matter of minutes. Now, it’s easy for you in your warm seat atop your ivory tower to say that I should just suck it up and wear warmer clothes. But friends, when you’re in a freezing apartment at night and the cold is so bad that it’s seeping into your bones until you sit in front of a space heater for a good 20 minutes, the last thing you want is long wet hair dripping down your back or soaking through your pillow as you try to go to sleep. Washing in the morning is even worse with temperamental winds that feel like ice picks hitting you from every direction.

So the aforementioned lemons needed some sweetening. How can I find a way to have fun with this? I knew I didn’t want to straighten my hair, I could be more creative. Thus began the 1-week wash-free challenge.

Some of you will say,big deal, I go a week without washing my hair all the time.” Ladies or gents, this post is not for you. It’s for those of us whose thin hair gets quickly and easily greasy from product use, dirt and crud from city living, or sweaty work-outs. For those of you screaming “EWWW,” just remember that daily hair washings are a very new phenomenon as far as mankind is concerned, and is a product of our over-obsession with being squeaky clean and bacteria-free. Any crud in your hair is nothing compared to that on your jackets, shoes, and kitchen sponges. Also, VERY IMPORTANT: I am not saying shower-free. I am still showering and washing my body every day.

If you’re interested in how I maintained a relatively normal 7 days with work-outs, going to my office in Manhattan of all places from Monday to Friday, and doing all of my usual routine stuff, please read on for a daily play-by-play and you just may learn a trick or two.

Day 1: Sunday. I washed my hair after taking a nice jog outside. It was early enough in the day that I could sit in front of the space heater and wait for it to try completely before going anywhere. I used minimal gel, about 2/3 of what I usually use. The more product you have in your hair, the cruddier it will get.

Day 2: Monday. I woke up with clean hair; I had been careful the night before to keep it up off my neck by fanning it out over my pillow while I slept. Fluffed it up a little and left for work.

Klorane dry shampoo spray.

Day 3: Tuesday. It was starting to look a little tired, so I sprayed in some nice volumizing dry shampoo after I woke up. I prefer my natural powder brand, but in a pinch the Klorane spray brand gives you a much cleaner feeling. Fluffed up my roots and went to work.

Day 4: Wednesday. My hair held up pretty well after the dry shampoo, and I slept with a side braid to keep it off my neck and to reduce snarls. Still, when I woke up this morning my roots were feeling pretty stiff and greasy. I grabbed a boar-bristle round brush and my blow-drier. (My fabulous hair stylist/model friend taught me this trick for eliminating oil at the scalp and adding height to the roots.) I concentrated on my roots and lifted the hair with the boar-bristle brush while aiming the blow drier directly at my roots. I did this all around my head. I did not pull the brush through my hair in order to disrupt the curls as little as possible. This gave me a much more unstructured look, but I loved how full and long it appeared! Sometimes it’s ok to have a more tousled style. In order to make it a bit more organized, twist some of the curls with a slightly wet finger to add definition amidst the chaos. So far this was my favorite hair day this week!

The sock bun. Photo courtesy of Hello Giggles.

Day 5: Thursday. It was time to embrace the grease and try the famous sock bun. Looked awesome, and I wet the palms of my hands and ran them lightly over my hair around the crown (not touching the bun) and then put a light coat of gel on my palms and ran that over my hair as well. It kept frizzies in place all day. During my morning commute, in order to combat wind-fraying or impromptu humidity in the subway, I wrapped a light scarf loosely around my head.

Day 6: Friday. I woke up and felt once again that my roots needed a little lift and de-greasing. This time I reached for my Cold Spring Apothecary all natural dry shampoo made with no harmful chemicals or inhalants. I separated my hair into several different parts and sprinkled it directly onto my scalp. I then rubbed it in, carefully threading my fingers under my top canopy of hair so I wouldn’t ruffle the strands themselves. Next, I put my hair in a high pony tail so that the front of my hair maintained a little lift around the crown, and I braided the pony tail. Then I took several bobby pins and pinned the braid to the back of my head to disguise any greasiness or unkempt curls there. It kind of resembled the back of a corset, which was pretty neat! I then sprayed some hair spray around the crown of my head to keep flyaways in line.

Day 7: Saturday. I woke up for my morning run and employed the sock bun again, but this time with a much larger leg warmer instead. It was kind of funny running with this big sock on my head, but I also pinned it in place with tons of bobbies and put a thick cloth headband around my head to keep my ears warm and sweat off of my hair. When I got home I took it all down and it actually wasn’t bad! But it did need more body. So for my final act during this waterless week, I prepped to go out with my boyfriend and another couple for dinner. I grabbed a comb and started back combing my hair at the ends this time, not at the root. This gave me some extra body. Then I piled my hair up again on top of my head and smoothed back frizzies around my face, and did the leg-warmer bun again. With the added volume it looked amazing! The hair around my face was starting to look a little worn, so I drew some extra attention to the bun by wrapping a cool metallic headband I have around the base of the bun and clipping it into place. I felt very Hepburn-esque!

So here we are again at Sunday and I washed my hair the moment I woke up. I really enjoyed this experiment, and if we don’t get some serious heat in this place I can see it becoming a rather regular occurrence this winter. My hair is definitely no worse for the wear, I guess the oils from my scalp helped to keep it moisturized even without an oil treatment.

Lessons Learned:

* A week water-free isn’t so bad if you keep on top of scalp greasiness by blow drying it and using dry shampoo. Just limit aerosol use since it’s not good for you!

* Toward the end of the week, learn to work with the grease. Choose styles that require your hair to be plastered to your head, then just frizz out the ends for more body.

* The sock bun is a great way to limit sweat distribution throughout your hair while you’re working out! Just don’t use it if you’re going to be turning upside down or doing jumping jacks a lot, that could get messy.

* Wearing a scarf loosely over my hair instead of a hat elicits weird looks from strangers and co-workers. Still not going to stop doing it because it works!

* Not a single person seemed to notice that my hair was unwashed all week, and I suspect that my hair appreciated a break from the wash and dry routine.

Voila! I hope I’ve convinced you to try a waterless week yourself sometime, it really forces you to be creative, and there are lots of blogs with fun hair ideas that you should experiment with. Enjoy, and stay warm!

Strong-Hold Gels

I had the pleasure of experiencing an evening at Devachan’s location on Broome Street last night, and as always, walked away with delightfully new-found knowledge. The woman who was washing my hair mentioned that she always thought she had straight hair, which I hear is often the case with wavy-tressed beauties, but is not something that I can begin to fathom.

It was when she started using a strong-hold hair gel that she found that she was able to maintain a more authentic curl in her hair, because the hold would cement the scrunched up curls that she created during the product application process. So I wondered if the reverse was also true–if I wanted to dry my curls by squeezing them in my usual downward-pressing motion to lengthen them, would it stand to reason that the strong-hold gel would retain the straighter strands that I’d created? Up until now, I’d always thought that the stronger hold gels were simply best at flattening hair down as much as possible. I definitely didn’t think they’d hold a wavy-haired persons locks to a curlier standard.

Well, alas my dear readers, it did! The curls dried much longer and looser (not flat, but loose and still voluminous) than they normally do when I wring them dry the same way. So new rule for strong-hold gels: They are best used sparingly on hair that is accustomed to lighter hold, maybe half the amount that you’d normally apply, but they are perfect for maintaining your hair’s shape if you want curls to have roughly the same pattern dry as they do wet. (ie: Scrunch hair upward for curlier strands, and wring them going from scalp to ends for longer, looser strands.) Be sure to scrunch the gel out once the hair is dry.

Note: Stronger gels will also stick to your hair and attract more dust, so be sure to use a cleanser next time you wash, and I don’t recommend using strong-hold gels as an every-day hair treat as they will really gook up your hair over time.

I Recommend: Devachan’s new DevaCurl Ultra Defining Gel. Just use sparingly–don’t say I didn’t warn you!

Cast-Away Curls: A Gel Story

Don’t fall prey to the crunchy curls!

It occurred to me yesterday that perhaps a lot of curly girls don’t know how gel is meant to work in our hair. This realization came about when someone asked me why my hair had looked “wet and crunchy” in the morning, and soft and bouncy that same afternoon. Yes, she was a straight-haired woman, but her question reminded me of how many curly girls I see running around with that same crunchy-wet look throughout the entire day.

I’m going to start by saying that it’s fine if you just like the way it looks. If you want your hair to be super tame, tamped down, and orderly, so be it! But to people who like my hair and want to find a way to achieve soft and bouncy curls, I explain that the gel should only be used as a cast while your hair is drying. Let me explain:

When gel is applied to wet hair, a chemical reaction causes the gel to harden as the hair dries; this is called a cast. It is setting your hair and allowing the curls to come together and stay together despite wind, humidity, and other such elemental strains. The longer you leave your hair in its hardened shell, the longer it will remain frizz-free and ready to be released from its chemical bondage. This works to our advantage if, say, we want to wash our hair the night before a big day but don’t want it to get ruined overnight. If you let it dry with the gel still hardened and intact, when you wake up you can scrunch, ruffle, and go with super-shiny beautiful locks. If you want to leave the gel cast in during the day at work so that it will look its best for a first date that evening, that’s yet another advantage.

Ahhh, that’s better.

When you’re ready to break the cast, you just turn your head upside down and scrunch your hair upward in an accordion-like motion. Then you put your fingers at the base of your hair follicles against the scalp and ruffle the roots–as usual, do not touch the hair shafts. This causes curls to separate, but not to frizz. As they’ve dried in their protective shell, they are cool, calm, collected, and ready to face the elements.

Get Wet!

While lounging poolside over Memorial Day Weekend (important side note: thank you so much to our troops, I truly appreciate everything you’re doing for our country!) I read in In Style that the wet hair look is in right now. This is great news for us curl-meisters, we just have to be sure to do it the right way. When I worked for a large publishing house years ago, I’d attract looks of scorn when I’d run into the elevator amongst the most judgmental of beauty editors and fashionistas with my hair still wet from that morning’s shower.

As we all know, diffusers are often more trouble than they’re worth. Curly hair looks best when it’s left to air dry, and in the summer no one wants to go near a hair dryer if they don’t have central air. I’d eschew their silly rules and go wet anyway, and my hair would be dry and glorious by lunch time. It’s just the price you have to pay for bounteous curls. While I was working there, one of the big-name glossies actually had a blog post about how bad wet hair looks at work.

Well, preposterously fickle beauty world, now it’s ok to rock wet hair. This is thanks to new red-carpet looks that favor severely slicked-back ponys and buns. It’s especially beneficial since you can gloss your ends with your favorite oil treatment or conditioning glaze and no one will be the wiser!

How to do it:

1) Wash and condition as usual in the shower. Leave in a touch more conditioner than you normally would, because no one will know and it’s good for your hair. It will also increase drying time, leaving you wetter longer. Skip the gel at this point.

2) Before stepping out, quickly run your head under the water flow one last time, then squeeze mostly dry (don’t scrunch, you want to elongate strands).

3) With your head upside down over the tub, coat the hair nearest your hair line with gel, on top of and under your head. Just one dollop will do. Don’t worry about your ends since they will not be seen. Instead, coat ends with a few drops of an oil serum.

4) Still upside-down, twist all hair into a bun on top of your head (I prefer this step without elastic, keep reading). Straights can do a low ponytail, but we know we’ll end up with a frizzy mess. Buns are best, even if you choose to do a low bun at the nape of your neck to up the class factor.

5) Don’t fasten your bun with an elastic — instead, anchor the bun to your head in the desired position with as many bobby pins as it takes.

6) There should not be any stray hairs hanging out, if you have bangs or really short layers that are not contained in the bun, be sure to bobby-pin them so that they appear to be part of the bun.

I paired my wet bun with a small scarf (think handkerchief-sized, but more chic) from American Apparel for my commute to work in order to soak up the drippings. By the time I got to work, my hair was dry enough to whisk off my scarf, and voila!