A Wondrous Find!

I am so happy to have found my first product in some time that really warrants a *rave* post. I had read about the Q-Redew online quite extensively before finally deciding to suck it up and fork over the bucks to try it out. Let’s start with the stats:

Hair Type: Curly/Wavy and fine 2C (but when humidified, much curlier). Short cut, above my shoulders, but seriously layered.

Situation: I have always had to wash my hair every three to four days due to it getting super greasy, flat, and boring. Especially since I’ve cut it short. After the first or second day, I tend to wear it up if I have to look nice to go somewhere.

Q-Redew Appeal: I was told that this little hair humidifying device will add moisture, volume, curls, and sass to flagging curls. Realizing that Florida has such a glorious affect on my hair, I thought, well… it could work!

The item arrived, and it reminded me of a heavier version of a blow dryer with a diffuser attached. I was easily able to set it up by putting some water in the little reservoir up top and plugging it in for a few minutes like a curling iron. Once it was warmed up, I pressed the button on the bottom while moving it through my hair slowly.

The effect was almost instant — my formerly sad and greasy-feeling locks were reinvigorated with fresh joie de vivre. The greasy feeling went away and it just looked like it does when I step out of the shower in a very humid climate without using products to tamp it down. I could add some more conditioner to my hair before using it next time in order to control the frizzies. My hair didn’t get too wet, but was bit damp after a few minutes of use.

Note: Not for those who like their hair to resemble orderly ringlets. This device will really bring out your inner 80’s lady or gentleman.

Concerns: Will mold become a problem if the reservoir is not properly emptied and dried out? Also, do not get it too close to your scalp, or you will get a little burned.

Final Q-Review: Yes, I would buy this again any day! It’s a great way to skip a wash and keep your style fresh during the week.

Buy it here

Products Galore!

As I’ve just posted, it’s important to switch up your products regularly. My Products Page has some staples, but I am always on the search for newbies to try. I have been blessed with recent suggestions from curl-friends as well as some amazing products that I’ve found on my own, so without further ado…

Spotlight: John Masters Organics

I can’t tell you how much I have enjoyed this line of products. John Masters Organics has been around for a while, but when I stumbled into their Soho store on a dreary Wednesday, I fell in love. They’re pricey, but make for a stellar hair indulgence. The cider hair clarifier is unique and something that you can probably make at home, but this is a good introduction to a new way to cleanse and clarify strands.

john-masters

My favorites: Lavender & Avocado Intensive Conditioner ($9-$41), Herbal Cider Hair Clarifier & Color Sealer ($17), Rose & Apricot Hair Milk ($26), Sweet Orange & Silk Protein Styling Gel ($17.50)

***

Other great brands to try:

Desert Essence Coconut Soft Curls Hair Cream 

“This has been great for silkening and softening my hair, which is really prone to breakage in the winter.” – E.K.

Buy it here ($10)

Bumble & Bumble Surf Spray

“This stuff makes my hair voluminous and gorgeous, I love it. I don’t even need to use any other styling products with it.” – E.K.

Buy it here ($32)

Briogeo Curl Charisma

“This light cream smells great and leaves my hair soft and not crunchy. The only downside is that it’s a bit pricey, and I have to use a lot on my very thick hair!” – K.E.

Buy it here ($23)


No Touching!

1379670618259715621Here we are again, another dreaded winter. Post-holidays, post-sunshine, post-fun. I know that some of you are not experiencing the cold and dreary days the way I am here in the Big Apple, and some of you may even love this time of year (if so, more power to you!) Regardless of which camp you fall into, there is always time for a hair care re-vamp. I am here to remind you of two very important rules that I haven’t always stressed enough, which will hopefully help to add some sparkle to your life.

When your hair is drying and once you’re all styled and out on the town, touch strands AS LITTLE AS POSSIBLE!

I am super guilty of this naughty behavior. When my hair is drying with gel in it and it gets crispy, I have this habit of de-crisping curls methodically by rolling hair between my fingers until it’s all totally silky and de-crunched. However, the more you touch your hair, the greasier and frizzier it gets. Aka, the more often you’ll have to clean it. I was reminded of this recently when I was totally distracted and didn’t touch or fuss with my hair at all after washing and diffusing it, and I saw myself at the end of the day and I was having the best hair day of my life. Coincidence? I think not! Which also brings me to…

 Switch up them products!

This is an easy trap to fall into, because what do we do, have a rotation of a thousand products gunking up our shelves? Heck no. But when one conditioner or gel runs out, instead of going to buy more, try something new. But do your research! Stick with good brands that use pure ingredients and have a golden reputation with curly hair. I always stick to my Devachan One Condition (no, they don’t pay me a cent to write this) and Angel, but the others are on constant rotation. Refer to my products page or this new post for suggestions.

***

Not too much trouble, eh? It is ok to scrunch your hair to get the crunchiness out, but wait until the last minute possible. The crunchy curl effect from gel is called the “cast,” and it helps the hair to dry in a nice shape and to stay shiny and frizz-free. The longer you leave the cast on your hair, the nicer it will look when it is released from its gelled prison.


Hair Color for Naturalists

madison-reed-hair-colorOne subject that I am always hearing about is whether or not to color your grays when they start springing up with more consistency. While this is not yet a concern for me, I know that it’s right around the corner and I decided to start fretting about it early (one of the many side effects of having generalized anxiety disorder — we get worrying done ahead of time!) My concerns are as follows:

  1. I am all about being natural, and I don’t really want to feel as though I have to alter something to such an extent to feel good about myself. What’s wrong with some grays? Also, I live in Brooklyn where women younger than me sport silver locks and look great. But am I personally ready to be as self-assuredly cool as they are?
  2. I had always planned on using henna dyes, as they are natural, but I’ve been told by multiple people that they do not work on grays.
  3. Chemicals are scary y’all, and no I’m not an idiot that screams and runs away from anything with words I can’t pronounce in the ingredients list — I know that chemical compounds are a part of natural life, etc. But just the smell of those hair dyes, it just can’t be good, right?
  4. Animal testing. I’m a pescatarian so I don’t have any huge moral ground to stand on, but I really truly hate the idea of animal testing without utmost gain (like finding cancer cures, etc.) I am also an animal rescuer, and something about rescuing one animal to kill another for cosmetics doesn’t sit right.

That’s about enough to keep me up at night, so let’s stop while we’re still ahead shall we? I decided to do something as simple as googling “natural hair color products” and pulled up this custom color brand called Madison Reed. They claim to leave out the “bad stuff” and do not participate in animal testing. However, are the ingredients really body-safe? We are putting this on our HEADS, after all. And does it work? Are you willing to be my guinea pig (hehe)?

If you have any suggestions as to coloring techniques, or if you yourself have wrestled with this quandary, please speak up in the comments!

Short Story

Hey curlfriends!! Spring is in full swing here in the Northeastern US and I’m sure in many other places around the country. I don’t know about you, but one of the first things I like to do when weather gets nicer and bottoms get shorter is to lop off several inches of hair. The last time I went really short was in college after a bad breakup when I felt as though I needed a fresh start. Now I’ve done it again, but for an entirely different reason.

After my wedding, I decided that I was sick of babying the long locks that I had been growing out for almost a decade. I had been itching to cut it all off even before the wedding, but made myself wait so I could have a more versatile hairstyle. As soon as we returned from the honeymoon, I partook in a somewhat customary fresh-start ritual and had my stylist cut off about 10 inches. In curly hair world, that’s like two feet. She layered it a lot because I always say I want a nice big round look, but we left enough length so that my curly bottom layer would still reach my shoulders.

But was I satisfied? Of course not! About a month later I started to develop a bit of what I will unapologetically call a “mom cut” and it was just boring the heck out of me (sorry moms who have plenty of other important things to worry about) as it was starting to shapelessly inch past my shoulder line. This time I took to the shears myself, which by now you probably know I am fearless about (after lots of practice) and I just started chopping. I cut it so it was basically even all the way around, and when dry it comes to about two inches above my chin. I didn’t layer much, but I did snip a few chosen pieces an inch shorter than the longest strands to add a bit of personality.

IMG_4427Now my hair is shorter than its been since college, but it looks 1000000x better because I am now a Curly Girl devotee! I didn’t even put in any gel this morning and it’s fluffy, composed and I love it. As always, I left in a good amount of conditioner after my shower to ward off humidity (it did rain this morning). I don’t have to oil treat as much now because I keep cutting it each time it gets too long for my liking which nixes split and dry ends.

Number one tip when cutting your own hair: Let it take days, maybe even a week to finish. You will see pieces that aren’t quite working for you here and there, and it may even feel a bit uneven in some places. Just slowly snip off little tiny amounts until you’re happy with the final result. Then do it all again in about two months! To do the back, I look at my profile and snip, then compare to what I see in a mirror, using another mirror as a reflection. It sounds laborious but it’s not so bad.

If you feel totally uncomfortable cutting your own hair, just make sure to find a great stylist who listens and understands you. I have two motivators to cut it myself: I’m in graduate school and broke, and I don’t usually find that others understand exactly what I want my hair to look like. When I do it myself and take my time, it comes out perfectly every time.

More proof that short curly hair rocks here, and below. Enjoy!!

th very-short-curly-hairstyles-pictures-very-short-curly-hair-women-fashion-2013-574x657th2th3

The Wedding Issue

kiss

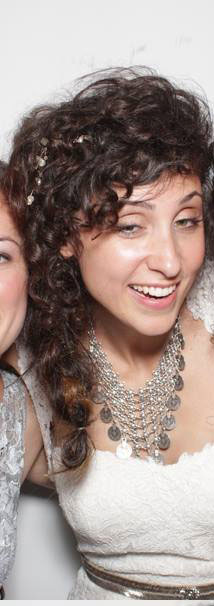
I’m not one for PDA, but my hair looks good here.

As promised long ago, this is the post that will detail the way that I chose to do my hair for my wedding. The fabulous Amy from Arte Salon in Soho, NYC was my guide, and we practiced the style twice before I did it myself on my wedding day. I had to be thrifty and I also know that I’m one of the few people who can style my hair the way I like it, so I didn’t want to take the chance of having a hairstylist upstate try to make me look like a porcelain doll with fake-looking hair.

I should go into this saying that I wanted volume, and I wanted a slightly “undone” look to match my country wedding in the Catskills. It also matches who I am, and I firmly believed that I should look like a done-up version of myself on my wedding day. Not fussy and constricted. I even wore cowboy boots with my dress.

But I digress! Below are the steps and materials that I needed to do my ‘do.

Materials:

– $40 fake hair extensions

– Lots of bobby pins

– Hair adornment from BHLDN, purchased on Tradesy.com, my new-found BFF.

– Hair spray

– A borrowed $200 Mason Pearson brush

Method:

When you are manipulating your hair, it is best to work on second-day hair. You want it to be a little “dirty” because it will hold styling better than clean hair. I ended up washing my hair the morning of, but it probably would have been better if I hadn’t.

1) Tease out dry hair using the Mason Pearson brush, or another dense boar-bristle brush. Learn how to tease your hair correctly to minimize breakage. There will be breakage, so this isn’t something you’ll want to do often. You basically back-brush hair at the roots until it is very ratty and fluffed up, and then lightly skim the brush over the top of the hair to smooth down the exterior. The idea is to build volume, so you want to do it in the areas where you need the most bulk: on top of your head, around the crown, and on the sides. The benefits of a Mason Pearson is that they use about three different types of bristles and it works well to stimulate your scalp to distribute oils and make hair shinier and ultimately healthier. Note: Don’t ever blow-dry while using this brush because some of the rubber bristles will melt.

2) If you’re using clip-in extensions, put them in now, after you’ve teased the parts of your natural hair that you wanted to tease. Hair should be at its full volume. If you purchase real hair, you can curl it. If you get synthetic, you can’t. You also can’t tease synthetic because it won’t hold. I found this out a bit late, but was able to work it into my braid and blend in enough of my real hair to make it look natural.

hair-pins

Hard to see, but I made little triangles going up the back of my hair with groups of three interconnected bobby pins. They are stronger when working as a team!

3) Create an armature (shown here, third one down) at the back of your head using many criss-crossed bobby pins. This is similar to the way you’d do your hair in a French Twist. It’s basically just interconnecting them to make a support to hold up lots of hair in a way that’s more supportive than just using free-standing bobby pins scattered around. Then you will sweep other, loose hair over the armature and pin that into place to hide the armature.

4) Braid the hair that is left hanging. Loop the end instead of leaving a loose rat-tail look, or if you have real hair you can curl the end.

This is toward the end of the night and things were getting messy. But you can see my hair pretty well here, so I shared it. That's how much I care about you all.

Drunk.

5) Take a final look and make sure nothing is sticking out anywhere that it shouldn’t be, use a curling iron to curl any loose tendrils, and place hair around your face the way you want to. If you have fine hair and choose to use a curling iron for loose pieces, those pieces will probably be straight by the end of the night. I should have just wet my loose pieces and let them air dry rather than try to curl them, but I wanted big, beautiful curls!

6) Add any hair pieces to your ‘do, and voila! Since I did a side braid, I put my piece on the side with the braid and tried to make that side of my head visible when I was coherent enough to think of it.

Ultimately I loved my unkempt, messy hair look mixed in with a few shiny, well-coiled and curled strands. The look is supposed to be un-fussy, slightly glamorous, and natural-looking. Oh, the irony!

How do you like it? What would you have done differently? Have you done something similar with your hair?

SssBRING it on!

I hope that everyone (who lives in a four-season climate) made it through the winter relatively unscathed, both physically and emotionally. Days are getting longer, weather is getting warmer, and the sunshine is invigorating our bodies one day at a time. Ah yes, spring brings many things, among which is the reminder of our bodily hair existence. Perhaps you’ve begun waxing, threading, or even shaving again after a bit of a hiatus. Maybe your curly hair has been uncovered by a hat or scarf long enough for you to notice that you need a cut, trim, oil treatment or drastic makeover. Whether you have needs large or small, below is a little manual of next steps to help you feel your freshest and springiest. Enjoy and have fun!

littleAnjaLookin’ Fine: Good for you, you made it through winter and your hair is still on top of its game. Maybe you kept up a routine of oil treatments throughout the winter, and likely keeping hair covered with a hat protected it from sun and wind damage. Even if it looks amazing, exposure to harsh heating systems and clothing fibers rubbing against our hair means that we can always benefit from an oil treatment or hair mask every week or two. I am always surprised to see how much better my hair looks after one of these treatments. Here are Pro, Low, and On-the-Go options to regenerate those silky locks.

Mild Damage: This is to be expected as spring starts rolling in. Curly hair naturally benefits from added moisture in the air that comes with spring and summer, and the healthier and more natural your curly hair is, the more you will likely notice that you love your hair in humid weather. Follow the tips above to maintain a healthy conditioning regimen. If you’re interested in learning how to give yourself trims, next time you get your hair cut pay attention to how your stylist does it, and chances are he or she will be happy to show you how to do minor mainenance on your ends yourself. Make an appointment with your hairdresser and indulge in a healthy trim!

I’m Feeling Lucky: It is definitely possible to trim and cut your own curly hair. I do this all year long and generally go in for a professional cut once a year when imagesCAOEV51Zit starts looking too shaggy. Being blessed with curly hair, we can get away with uneven cuts, and cutting dry is a way to ensure that you are styling the hair the way it is meant to be styled. Our curls are not all the same, so cutting hair wet like stylists do with straight hair can be detrimental to our curls’ expression. Try watching a video and start with a little trim, and don’t expect final results in one session. I normally look at it for days and trim here and there as I see fit before I feel fully satisfied. You should also invest in a good pair of shears to avoid split ends. You’ll soon see how liberating and easy cutting your own hair can be!

Serious Makeover Needed: Perhaps you’ve considered all of the above and you need something a bit stronger. Book an appointment with your hairdresser, or ask women or men around you who does their hair if you particuarly like their curly style. Then spend some time researching hair cuts that appeal to you, and have photos with you when you go to your appointment. Explain to your stylist what your day is like, your realistic mainenance level, and ask any other questions you may have. They are usually happy to answer! Everything I know about curly hair I have learned from hairdressers and blogs.

Quick Hair Conditioning

pic_of_cellophane_hair_conditionerWhat many people do not know is that leave-in conditioners are a hoax. When I say that, I am being super judgemental and opinionated, as my Certified New Yorker Status entitles me to be. But in all seriousness, this product category is normally a way for haircare companies to squeeze extra money out of us. So next time you’re shopping for a quick and easy on-the-go conditioning product, skip the leave-in conditioners and try one of these tried and true options:

Just Leave Your Conditioner… In

This is the easiest and you can do it as often as you’d like. Before you get out of the shower after washing, put some One Condition (or your chosen high-quality conditioner) on your hair concentrating on the ends. Then, only rinse out about 75% of it. You will know when you’ve left enough in because after you’ve hung your head back to rinse it out, feel it with your hands and it should still feel slightly like wet seaweed. Not as soft as when the conditioner is still there full-force. It may take some experimentation to work out the percentage to leave in. I usually co-wash my hair with a cheaper conditioner like Aussie Moist and save the good stuff for my leave-in. Remember: while quality conditioners are pricier, you can use a lot less for maximum benefits.

Spray Oils

Spray oils are great for the busy guy or gal. I’ve used it on my husband’s hair when he complains of dry scalp or hair. My favorite is an Argan Oil version, and I put about a “dime-sized amount” into my palm, rub my hands together, and lightly whisk it through dry hair on my way out the door. You want to use enough to really get the ends, but not so much that it looks greasy. Again, experiment.

Hair Masks

If you want an overnight or few-hour solution but don’t feel like going to the hassle of concocting a full oil treatment or dealing with a lot of mess, use a hair mask and put a shower cap over that before bed or before lounging around the house on a lazy day. You can use as much as you want and rub it into your scalp and hair, and then rinse it out with equal parts lemon juice and conditioner to get it all. I usually do 4 tbsp. of each. There are endless hair masks that you can try, and at varying price points.

Winter Root Lifter

Screen Shot 2015-02-12 at 5.04.44 PMI hope that everyone who shares my Northeastern United States weather system is faring well through yet another winter! I have been battling the usual ills: dry, limp hair, an itchy scalp, and more frequently required oil treatments. I actually got bored over the holidays and cut my hair off, so when it’s curly it comes about halfway down my neck. I am LOVING it and am so glad that I finally took the plunge! I plan to grow it back out again, but at more even lengths to make it feel fuller and less like a mullet. While this leads to naturally healthier hair since scalp oils don’t have as far to travel to saturate my ends, I have definitely still been struggling.

One cold-weather hero of mine has always been dry shampoo. I now realize that that was completely asinine. Curly-haired folk have to constantly combat dryness, and moisture and conditioning should be a part of our daily regimen. My hair is so fine that it tends to get greasy after a few days, and my knit winter hat also presses it down so that it’s looking stringy and sad by day two. In order to stretch hair washes by at least a few days each week, I would spray my hair with oil and proceed to dust some dry shampoo on my scalp. This works well for a couple of hours, but doesn’t hold up through a busy day or workout.

I decided to check out alternatives that would condition while lifting the hair at my roots, essentially solving my limpness problem. Luckily for me, the savvy young lady (with AMAZING hair) who helped me at Ricky’s near Union Square in NYC had the perfect solution!

5472Enter the moisturizing root lifter. It acts as a dry shampoo might, but without the drying component — it simply lifts roots while conditioning the scalp so that itchiness and flatness are no longer a problem. It also has a heat protector! I spray it sparingly on my roots after washing and styling but before blow-drying, and now my do’s are easily lasting three days before I need to put my hair up or wash it to look presentable. My hair even looked a bit like a wig when I woke up on day two yesterday, it was so full and that was certainly not the case before. I even wore a hat over it for the entire day prior. The ingredients are harmless and actually seem to be helping my hair to be healthier and stronger. I have not found that I have to reapply before my next co-wash.

If any of the issues above sound familiar to you, try it out and let me know what you think  in the comments below! What else do you do to battle winter flatness, static and dryness?

Diffuse the Situation

Hello my fine curly-headed friends! It’s been so long, and for that I apologize. I’ve been buried in books, papers, horses, kids, and classes for the past four months and have finally been able to come up for air. My hair is also ready for some action and is getting a trim today because it’s turned into a proper nest over the past few neglectful months.

Although I haven’t yet posted about my wedding hairstyle, I wanted to pop in with a quickie about diffusers. We are now entering the winter months in the good ol’ US of A and in other places around the world, so that means less going outside with wet hair and more going greasy due to a strong desire not to get wet and chilly. It’s still important to maintain appropriate hygiene, and let’s remember that pulling hair back into a ponytail or bun every day causes breakage, which means split ends and lackluster locks.

As always, there is an answer. I’ve used two types of hair drying diffusers myself and there is a new gal on the scene. Let’s examine them, shall we?

Old Reliable*

oldreliableThis friendly reminder of childhood and Mom’s 80’s hair tools is a true blast from the past, but it is still relevant. This diffuser isn’t so much designed for the average curly-haired user, but for anyone who wants to dry their hair without frizzing it to high heaven while still adding some volume.

Pros: It gets the job done, hair will dry. Curls do not separate and spazz out the way they would with a “naked” hair dryer.

Cons: It does not target the roots of the hair, meaning that getting that fully-dry feeling takes longer and comes with the consequence of additional heat damage and agitation to hair follicles. It also doesn’t do the greatest job of diffusing airflow, and will cause some curls to separate and some frizzing to occur. It also creates major drama — think 80’s glamour girls and guys. Not everyone is into that, but if you are, rock on, gorgeous!

Buy it at Drugstore.com or in most hair product retailers.

The Thing*

thethingThis Devachan creation looks scary and may frighten a significant other if you leave it hanging out in the bathroom on its own, without the context of an attached hair dryer. This may be seen as a bonus.

Pros: This lovely lady was designed to target roots and decrease frizzing and volume, which is fantastic. Just because we have to blow-dry our hair doesn’t mean we want it looking puffier than when we let it air dry, am I right? Devachan’s model works really well when you are in a rush because you can cut straight to root drying for warmth and leave the ends to dry on their own. You can use the “hand” to either push curls up for volume or just hold it in your hair while curls dangle freely while being dried in a relaxed position. It’s also great for adding volume at the roots.

Cons: While it comes with many improvements, this diffuser does not necessarily cut back on frizz as much as I’d like. My short top layers get blown this way and that, creating a frizzy, unpolished look. This is fine when I am up for it, but I’d like to have a little more control over the air flow.

Buy it at Amazon.com or in any of Devachan’s locations.

Wind Bag*

windbagI’ve only become aware of this diffuser recently. I don’t have a full analysis on it because I have not used it myself. However, a friend has said that it’s awesome and works really well at controlling airflow and limiting flyaways. I’d probably use it in conjunction with The Thing* because it doesn’t look like it would get at the roots as well. If you’re looking for something to send me for Christmas, look no further!

Buy it at Hair Beauty Bargain Bizarre.

All three of these are pretty much universal and will fit any standard dryer. Also, it goes without saying that you use a diffuser because you’re not drying with the controlling aid of a brush. I didn’t have to tell you that, though. Have you tried any that aren’t on this list? Have anything to add**? Please leave feedback in the comments below! Stay warm my fuzzy friends, and take care of yourselves.

* I made up all of these names for your reading pleasure.

** Like this one?!