Quick Hair Conditioning

pic_of_cellophane_hair_conditionerWhat many people do not know is that leave-in conditioners are a hoax. When I say that, I am being super judgemental and opinionated, as my Certified New Yorker Status entitles me to be. But in all seriousness, this product category is normally a way for haircare companies to squeeze extra money out of us. So next time you’re shopping for a quick and easy on-the-go conditioning product, skip the leave-in conditioners and try one of these tried and true options:

Just Leave Your Conditioner… In

This is the easiest and you can do it as often as you’d like. Before you get out of the shower after washing, put some One Condition (or your chosen high-quality conditioner) on your hair concentrating on the ends. Then, only rinse out about 75% of it. You will know when you’ve left enough in because after you’ve hung your head back to rinse it out, feel it with your hands and it should still feel slightly like wet seaweed. Not as soft as when the conditioner is still there full-force. It may take some experimentation to work out the percentage to leave in. I usually co-wash my hair with a cheaper conditioner like Aussie Moist and save the good stuff for my leave-in. Remember: while quality conditioners are pricier, you can use a lot less for maximum benefits.

Spray Oils

Spray oils are great for the busy guy or gal. I’ve used it on my husband’s hair when he complains of dry scalp or hair. My favorite is an Argan Oil version, and I put about a “dime-sized amount” into my palm, rub my hands together, and lightly whisk it through dry hair on my way out the door. You want to use enough to really get the ends, but not so much that it looks greasy. Again, experiment.

Hair Masks

If you want an overnight or few-hour solution but don’t feel like going to the hassle of concocting a full oil treatment or dealing with a lot of mess, use a hair mask and put a shower cap over that before bed or before lounging around the house on a lazy day. You can use as much as you want and rub it into your scalp and hair, and then rinse it out with equal parts lemon juice and conditioner to get it all. I usually do 4 tbsp. of each. There are endless hair masks that you can try, and at varying price points.

Product Alert! – Curls in a Bottle

CIAB-2I’m so excited to announce a new product that I’ve tested and absolutely love! As you may remember, it’s important to rotate all of the products you use, which are basic non-damaging cleansers (WEN conditioning cleansers, DevaCurl No Poo, DevaCurl Low Poo, lemon juice and conditioner equal-parts mixtures), conditioners (DevaCurl One Condition, Ouidad Curl Quencher Conditioner, Argan Oil conditioners, Avalon Organics Volumizing Rosemary conditioner, Aussie Moist conditioner, etc. etc. etc. and yes I have all of these and more in my shower right now), and styling products. We’ve discussed cremes, gels, mousses (meese?), you name it. I’ve found that a light gel works best for my hair type. Until now I’ve mainly been using DevaCurl’s Angel and Ouidad’s Climate Control gel because both are light hold.

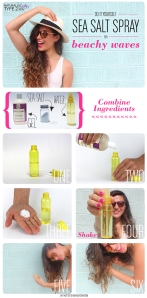
Salt-Spray-RecipeHOWEVER! My hair has been looking stringy and angry lately, despite oil treatments and my tender lovin’ care. I saw a brand I’d never seen before when researching my hair type on Naturallycurly.com. [Btw people — check them out! You take a quiz to determine your curl/hair type, and then you can read all about other members who have your hair type and what products they use, how they style it, and much more. It’s like a Pinterest board of curly hair care. My type is 3a, and they corroborated my findings that a light hold gel is my hair’s bff].

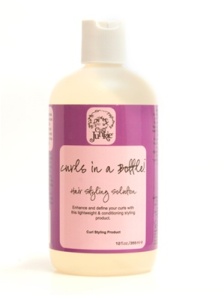
This fabulous new gel is called Curl Junkie’s Curls in a Bottle (pictured above), and it was being used to demonstrate a DIY sea salt spray (if you haven’t seen this yet, it means you need to like my Facebook page). I just knew I had to try it immediately.. and yes!!! It worked! It’s highly conditioning with no harmful ingredients and was so light it looked like water. Since my hair can’t handle heavy hold gels, it’s perfect!

While I was at Ricky’s picking it up, I heard a young woman asking where she can find leave-in conditioners for naturally curly hair. The straight-haired lady behind the counter was directing her when I intervened and said, “NO! You don’t want to buy a product labeled as a leave-in conditioner. You just want a really great quality conditioner, and when you’re in the shower apply it, concentrating on the ends, after you’ve cleaned your hair. Then stand with your head falling back under the nozzle and let the water rinse out maybe 20%-50% of it.” It only takes a second for most hair types/shower pressures. So let this be a reminder to you all: leave-ins are meant to be diluted conditioners, but because they’re made to be stocked on store shelves for a long time and also because people want their leave-ins to feel smooth and not thick or sticky, they load them up with lots of alcohol and other drying, damaging ingredients to make it evaporate faster. Kind of counter-intuitive, no? Just use a quality conditioner that you already have and water it down yourself in the shower.

I saw the young woman head over toward DevaCurl’s One Condition per my suggestion, and my only regret is wishing I had creepily followed her to fully ingratiate her into the world of naturally curly hair care. But alas, I left her to her own devices and hope that she’ll find CurlyNikki.com or NaturallyCurly.com or even my little ol’ blog. So girl at Ricky’s, this post goes out to you.

Remember friends: As curly girls who have wrestled with the wave, contended with the curl, kerfuffled with the kink, it’s always our duty to spread the knowledge and love. Mentor new curlfriends and gain the satisfaction of knowing that you’re a big part of making this world a happier, healthier, prettier, and slightly more genuine place.

Wedding on the Way!

Hi friends! It’s been so long! I wanted to update you with some of my musings, and I stand strong against posting unnecessary nonsense just for the sake of it. This probably is just that, but bear with me because I miss you!

Arte Salon in Soho, NYC

Arte Salon in Soho, NYC

As you may remember from a recent post, I found an amazing new hairdresser, Amy from Arté Salon in Soho and YES that means I’ve ditched Devachan and their lofty(er) prices. Who knows if I’ll return eventually, and I still use and preach their products, but the salon staff and atmosphere are a bit uptight and I forgot what the fun neighborhood vibe can be like in a smaller salon.

ANYWAY — the countdown is seriously under way to my upcoming wedding. It’s going to take place on August 17, 2014 and my beauty regimen has been implemented pretty much since our engagement last year. I’ve included my skincare routine that was dermatologist-recommended and approved below in case you’re interested, voyeur that you are! My skin has never been better.

The cut Amy gave me the first time was monumental. In the words of one co-worker, “the hair cut to end all hair cuts.” However, in order not to thin out the middle too much so I can pull off the mystery hair style I’ll be rocking on the big day (No hints! You’ll see soon enough!) my most recent shaping had to be on the stingier side. Because of this, I’m kind of hating my hair lately. I also haven’t fully solved the oil-clogging-the-shower-drain fiasco and every time I do an oil treatment the bath completely backs up and we have to use Draino — which is so bad for the environment and old pipes, y’all. I will definitely be applying one this weekend and washing it out in the gym showers because it’s way overdue, but it’s just not the same. Sigh, the trials of living in a gorgeous pre-war Brooklyn brownstone!

In the meantime, I’m making good use of funky buns, sassy braids, and lots of hair accessories. I vow to make it through this trying time (insert sarcastic eye-roll here)!!! I will also update you soon with video footage on ways to cut curly hair to add some life to it between cuts. If you have gorgeous, thick, voluminous hair it may not apply to you as much, but for those of us on the thinner/finer side, you will want to tune in. I also love cutting my own hair when I can because it feels liberating. Coming soon!

In the meantime…CQA Talks: SKIN CARE

PM Instructions

1. Wash face and neck with Ceravé Hydrating Cleanser. I only wash my face once a day because I believe that over washing is bad (have you been reading my blog?!) and the best time to do that is after a day full of facing pollution and pollen outside. To keep extra-clean, wash your pillowcase often.

2. Dry completely, and apply four drops of Tarte Maracuja Oil to palm, then rub it into your face, focusing on wrinkly or dry areas. I do not have dry skin in general and I use this every night and I haven’t had any break outs, scaling, or issues whatsoever over the past year of using it nightly. This was the most severe winter I’ve ever lived through in the city and every other winter I’ve had dry skin issues from the freezing wind, but this year I had none. *Only use it at night* Some people I know use Vitamin C oil and that should have the same effect. I used to have an oily T-zone, but not anymore!

3. Apply a thin coating of Ceravé Facial Moisturizing Lotion PM to face and neck.

AM Instructions

1. Pour a generous amount of Witch Hazel on a cotton swab and wipe off your entire face and neck. Witch Hazel is a time-tested and grandma-approved way to fight redness and remove all excess oils before facing the day.

2. When face is completely dry, apply a coating of Ceravé Day Time Facial Lotion to face and neck. The SPF 30 is crucial to avoid sun spots, wrinkles, and signs of aging.

Bonus:

41GGyPC+FzLIf any parts of your body are dry, potentially starting to sag (ahem, ladies, this is me trying to be subtle), or even if you have any muscle tension or aches, apply Castor Oil to a piece of wool flannel and let it sit on the affected area for as long as you can. You can also apply oil directly to skin if that’s easier. It works wonders to keep my skin super soft! I wouldn’t recommend using it on your face, it’s too thick. Extra Bonus: Castor Oil also does wonders for your hair!

CQA Interview: Renee

Renee after her curly conversion.

Renee after her curly conversion.

Renee is a friend and was the perfect candidate for curl conversion. A couple of years after following this blog’s suggestions, her hair is looking more gorgeous than even I could have predicted. Let’s hear how she did it!

Curly Q&A: Before you became a dedicated curly girl, what was your hair care routine?

Renee: I would use Tresemmé shampoo and conditioner, a second conditioner of Nexxus and then would use Biolagé as a leave in. Once out of the shower, I would use a detangler with a Sexy Healthy Hair cream to style, and top with hairspray.

CQA: Sounds crunchy! What made you decide to ditch the ‘poo (traditional shampoo)?

R: My hair was starting to get frizzier, impossible to comb, and I had to brush it. I started talking to other curly heads about it.

CQA: How long did it take to feel comfortable shampoo-free?

R: Probably a couple weeks to a month, I didn’t have the itchiness issues but it was just getting out of the old routine.

CQA: If you didn’t have itchiness, your scalp was probably screaming to be left alone and it sounds like you were finally hearing its cries. What is your hair care and styling routine now?

Renee before her curly conversion!

Renee before her curly conversion!

R: I wash it with Deva Curl No Poo once a week if that, and rotate days with using Aussie Moist conditioner and MoroccanOil conditioner. Other days I follow with Biolagé as a leave-in. If the weather is humid, I will use DevaCurl Angel light defining gel in the shower to finish. To style it, I use a mixture of Devacurl styling cream and Redken Curvaceous Ringlet and add Moroccan Oil curl styling cream if it’s humid out. Once a week I will also use a Moroccan oil conditioning treatment.

CQA: Sounds like you’ve really found a formula that works for your hair! It takes a village. What are some of the biggest differences that you’ve noticed in your hair health and appearance?

R: My hair isn’t as hard to finger comb, it’s softer and lasts longer between cuts. The curls are also much healthier.

CQA: Has it affected other parts of your life at all?

R: It’s made my hair routine so much easier and shorter.

CQA: Was there ever a time in your life when someone made your curls seem unprofessional or inappropriate in a situation?

R: I’ve had a lot of people constantly ask me if this is my natural hair and it made me feel uncomfortable when they’d respond with, “because most white women do not have as curly hair as you do.”

CQA: I just love when people feel totally comfortable remarking on women’s physical appearances in such ignorant and nonsensical ways. Is there anything else you’d like to share with would-be curly converts?

R: If you must straighten your hair, be sure to use a heat protector first as that was one of my biggest mistakes around my wedding; it damaged my hair and took months to get the curls back to normal.

CQA: Thanks so much Renee! You truly are a story of success and I so appreciate your taking the time to tell us about your journey!

Round or Flat? The Age Old Question Rages On

scissors_hairI have mentioned the importance of a proper hair cut on a curly head many times, but I don’t think that the subject can ever be given enough justice. There have been times that I’ve looked like a worn out hag or a wet rat because of my hair, and times that I’ve resembled a movie star strutting down the red carpet of my overactive imagination (major creative liberties being taken here, but you get the jist). Make-up and general face-issues not-withstanding, hair can really make or break a look. It’s based on the curl pattern and frizz factor of the day, but mainly, it’s the cut.

Until now, I have faithfully returned to my beloved Devachan Salon in Soho, NYC. They just get it. They cut curls dry without question, and use my favorite conditioners and gels. For years I’ve tried to cultivate this sort of “Mick Jagger” curly/wavy shag that fits my face shape, and sometimes it’s great, but it grows out really quickly and needs more maintenance than I can afford. Plus, I like the shag because it feels carefree and fun, and you can’t be those things when you’re always worried about your hair.

I have the types of curls that can be really glorious and well-defined, but also tend to either frizz or lie flat. I hate flat. Frizz I can work with, since you can use good hair oils and lots of conditioner and the right gel to keep it in check. But flat, blah!

I saw a great curly hair cut on a woman at the gym, and it was short and super layered. Think Meg Ryan in City of Angels. I had to ask her who does her hair, and it was a woman named Amy at Arté Salon, also in Soho. I was displeased with my last cut from Devachan, where one of the stylists I used to love seemed to rush me and not really listen to what I was saying. They also charge a s&^%load, as anyone who’s been there will know. I decided to go to Amy for my first consultation ever, since it was free and why not. I am in the tricky stage between wanting a hair cut I can love on the daily, but that isn’t too short or sparse to be used in a romantic ‘do for my wedding this August.

Course, thick curls cut in the traditional accordion style.

Course, thick curls cut in the traditional accordion style.

I loved Amy at first sight! She was so perky and knew exactly what I was talking about. She truly listened, and even more, she explained something that I hadn’t understood before. She has gone to many curly hair cutting classes, and the traditional way to cut curly hair has been to cut curls in a pattern that falls down your head in an accordion style, meaning that each strand is slightly shorter than the ones just below it. The reason for this is that it allows curls to fall on top of each other in a less upward-direction, diminishing the dreaded triangle, but also squelching voluminous roundness. Since curls have only recently become socially acceptable (hissss), there isn’t as much request for afro styles in the majority demographic. But take my word, they’re a-comin,’ and they’re fantastic.

Curls scooped out from underneath, with the shortest layers toward the bottom. This can be done with longer hair cuts, too.

Curls scooped out from underneath, with the shortest layers toward the bottom. This can be done with longer hair cuts, too.

This accordion cutting style works perfectly for people with thick or course textures, since they have enough hair to support some serious shape. But for ladies like me who don’t have as much thick beautiful hair, and top layers that tend to be more wavy than curly when long, Amy says that you have to do the exact opposite. You want to cut hair as if you’re scooping it out from underneath, so that each hair is slightly longer than the ones below it. That way the shorter strands underneath are pushing the top layers up. She even showed me how to do it myself between cuts so that I’m not constantly coming back for a re-shaping. It’ll take some practice, but when I have it figured out I will post a video.

The moral of the story: If you’re not happy with your hair, you deserve to be for all that money you’re spending! Ask anyone whose hair style you like where they get it done and book a consultation. If you immediately click with the stylist, great! If not, try to find a way to connect so that he or she understands what you’re asking for. Pictures always help! And remember to be vocal: I had to speak up so that she’d cut my curls dry instead of wet, and told her not to use shampoo on me, with which she was happy to comply. My requests solicited an irritated side glance from a male patron to my right, but then again, his hair was super boring.

Oil Slick

Hello dear readers! It’s been a while. I make a point of only posting when I have something truly worthwhile to say, so I apologize if you’ve been feeling neglected.

olive-oilI’ve come across a slew of timely new products that don’t seem to be a total waste of money and are worth the investment: Easy-to-use hair oils. They come in many different brands and consistencies with a plethora of ingredients and application techniques that offer various benefits to hair and styling. I’d feel remiss if I didn’t mention that this is not a “new hair trend” by any means. Go to the small but super important “coarse hair” section of any drugstore and you’ll see products similar to these that have been on shelves for decades. This bevy of new contenders just comes in prettier packaging with highly-marketed branding, and the oils tend to be a bit more distilled so that they don’t weigh down finer hair types.

seaspongeThe first thing you should know is that the coarser the hair, the bigger the “pores,” and the more moisture that is needed. Think of hair porosity in terms of a big sea sponge with huge divots. The holes of the sponge are big so that they can absorb a ton of liquid easily, but the water also squeezes out more easily than it does in a more condensed sponge. Hair is this way too — if it thirstily absorbs everything you put on it, it loses moisture just as easily.

Below I’ve broken down a few that I’ve tried, which I’d recommend based on hair type, and how to use them. But first, a few ground rules.

1) Concentrate on strand ends when using oils. The ends don’t get as much love from natural scalp oils, especially on a curly head, and this is a big part of what causes split ends. And don’t shortchange your shorter layers — they have ends too!

2) Just because a product says to use it on wet or damp hair only, this doesn’t mean it’s a hard and fast rule. Hair absorbs more when it’s not wet — this is common sense. When it’s wet, it has already absorbed some water. When it’s dry, it’s only absorbing what you put on it. If your ends are feeling very dry, I’d definitely recommend using oil on them when hair is not wet.

3) Regardless of what some packaging may claim, hair oils are not a replacement styling product. They can be, if you’re ok with a slightly less tame hair day, because they will not hold curls together in a cast while they dry the way gels, mousses, and creams do. For an everyday look, you should probably expect to wear hair in a braid or bun that day to hide the greeeez.

4) How much you apply depends on when you are using it. Refer to the point above. I don’t style with oils on the “first day” of a hair wash cycle. Usually it’s when I go on to a third or fourth day that I start to feel like it’s a bit dry from days without conditioner. However, with very light application, and with a lighter oil mix, you can get away with running a bit over your gelled hair without greasy side effects. We also tend to wash less in the winter, and that’s when hair needs moisture the most. You will not use oils as much in the summer, but they are a great little product to pack in the beach bag for use after chlorine or saltwater abuse!

5) Your scalp can also benefit from oils. Itchy? Painful? Flaking? All of these can be side effects of a dry scalp. Not everyone gets dandruff, and dandruff is not the only indicator of a scalp in distress. Even if you have one spot that seems especially painful, rubbing a dab of oil or conditioner on that spot will soothe it instantly. It’s like magic. So if you’re already applying it to your ends, why not go all the way? But beware — this is an application site that will make hair look pretty greasy and you may not want to do it just before stepping out for the evening or heading to work. On the weekend? Cover up the evidence with a cute bandana or hair scarf.

6) Why not just use the EVOO in my kitchen cupboard? Ahh, the million dollar question! You can do that if you spruce it up with lots of yummy-smelling quality essential oils and mix them together before application. Otherwise, you will just smell like a fry cook all day, and you may get sick of that (unless you actually are a fry cook, in which case, go for it!) This is why I recommend the homemade oil treatment as an overnight remedy, not something to leave in your hair during an average day. The products below smell amazing, so any questions regarding your hygiene should be quickly dismissed.

7) Use hair oils as often as you feel is necessary, based on hair’s absorption. There is no drawback to using them, but if you over-do it you will see that it gets super greasy because it can only absorb so much. Over-saturation serves no purpose! You will know how to toe the line with your hair as you become more accustomed to using oils.

8) Wash with a real cleanser at least once a week when you are using oils. They don’t wash out with water and conditioner like other products and environmental deposits do. Because of this, you’ll want to treat hair, and especially your scalp if you’ve used it there, to some DevaCare Low ‘Poo, No ‘Poo, Homemade Lemon Juice-Conditioner cleanser, or WEN’s cleansing conditioner during shower time.

9) Start small. A dime-sized dab in the palm will go a long way. My hair is down to the middle of my back and that’s all I usually need, concentrating on ends and mid-length. If you need more you can always add more, but add in very small increments. Rub palms together and rake the oil through hair where it’s needed most.

10) When in doubt, read the ingredients!! Google any that you don’t know and you should get a good idea of how good or bad they are for your hair. Some synthetics can be extra slick, coating strands with more shine than moisture, so it’s best to go with products that have as short an ingredient list as possible.

Now, without further ado…

OjonWandOjon

– Course to fine type –

Ojon’s products come in two super-handy applications for all hair types. The first is in a bottle, and you can use it based on your hair’s absorption power with a dab in your palm that you rake through pretty liberally. If you need more, use it, but start small. The second applicator is like a mascara wand that can be used for flyaways. If you have a ponytail, say, and there are a few baby hairs that just won’t lie down, skim the wand over the trouble spots and they will simmer right down. This also works really well for straight-haired and short-haired ladies and gentlemen with stubborn cowlicks, so surprise your un-blessed friends with your new-found hair-saving savvy!

PalmersPalmers

– Coarse type –

Palmers’ products tend to be a bit on the gooey-er side, and can be used even more sparingly than the others. Coarse is not synonymous with thin — this hair type breaks more easily than all others, so oils are essential and Palmers makes a great product. Just because it comes in a spray bottle, that doesn’t mean you have to use it that way — in fact, I don’t recommend it. With a dab in the palm you are better able to control the amount that you’re using and where it’s being applied.
hask-argan-oil-and-hair-mask-L-oOR53vHask Argan Oil

– Coarse to fine type –

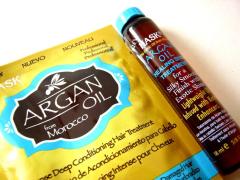
Argan Oil can be found in many product lines now, and with a variety of thicknesses and added ingredients. I like the Hask version, and it smells like a creamsicle. I use it more than any others, and it’s pretty thick so use sparingly and mainly at the ends.

moroccan-oil-treament-25ml-regularMorrocanOil

– Coarse to fine type –

MorrocanOil makes a long line of Morrocan oil products that have been widely circulated through the United States and they tend to stick to sparse, helpful ingredients. Their trademarked original oil is another example of a top notch product without too many unnecessary add-ons.
OrganixOrganix

– Medium to fine type –

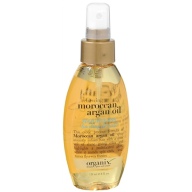
Organix Penetrating Oil Renewing Moroccan Argan oil is my newest favorite for my fine hair type. It’s light enough not to look greasy, smells so good, and comes in an easy-application pump bottle. It may not offer enough oomph for coarser hair types.

So Long!

I’ve been fielding a lot of questions lately about growing long curly hair. Mine is down to the middle of my back when wet, with a ton of layers and craziness going on that gets quite out of control between cuts. I actually love the “disheveled” look, but the other positive side to this is that my hair is given plenty of resting time between cuts. I get my hair cut about once every 7 months — partially due to the abnormal expense of my hair cuts, and also to the fact that I want it to be as long and full as possible before my wedding next year.

engaged<< Surprise! My amazing boyfriend asked me to marry him in late August and we look forward to a late-August early-September 2014 wedding. I will keep everyone updated on wedding hair ideas! In the meantime, follow my Pinterest board on the subject, and if you follow my board I’ll follow you right back! Ideas welcome. >>

When I went for my 7-month re-shaping cut at Devachan, I decided to get my $140 worth and asked the fantastic curly hair specialist for some tips on growing longer hair. I felt vindicated to hear that I’m doing all of these already, and am outlining them below for all of you! Please post any questions in the comments below and I’ll either answer them myself or ask a professional.

Condition a LOT! And more than that! Deep condition or use an oil treatment at least once a week. Curly hair is very prone to breakage, so keeping tendrils saturated is the best way to fight premature splitting. But… this tends to clog the shower drain. Something about the oils or the thick conditioner streaming out of your hair en masse can really gum things up. My plumber recommends filling a bucket with the hottest water possible and dumping it slowly down the drain when it starts to back up. Then run the hot water out of the faucet for a few minutes. That usually does it for me! Intermittent hair removal will also be necessary, as is routine, but you should do your best to catch as much as you can before it goes down the drain. BTW: Don’t fret if you gather more than your straight-haired sisters, curly hair doesn’t fall out as much as straight hair throughout the day since we don’t brush it and it gets tangled up in the curls. It all comes out at once in the shower!

blow-frierDitch the drier! Blow friers cause more breakage than anything, but nobody likes going outside with wet hair — especially in cold and inclement weather. The alternative, which I’ve posted about before, is to wash your hair the night before, bundle up and let it dry while you watch TV or eat dinner for an hour or two, and then go to bed and drape your hair up and over the pillow. If it’s too short for this, it should be mostly dry in a couple of hours anyway, and just do your best to keep it from smooshing against the pillow too much while you sleep. This is a great way for hair to dry undisturbed by the elements, making it shinier and with added volume from drying in a horizontal position (no gravity weighing down on the roots). But… some people are restless sleepers. For you, I’d still wash hair in the evening and give it as much time as possible to dry before you go to sleep. There is less friction between the sheets when you sleep on a satin pillow case! And on that subject…

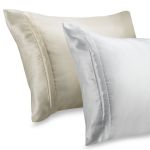
53380109096cSleep on silk or satin pillowcases. I’ve covered this many times, but I can never mention it enough. Silk or satin pillows are a hair saver. Everyone rolls around and does all kinds of crazy dance moves in their sleep, and hair takes the brunt of the friction and damage. If you’re sleeping on a cotton or similar pillowcase it will cause major frizz and damage. If you’re serious about growing your hair out, get a silk or satin pillow case right now!

braided_hairNo fuss, no muss. Hair likes to be left alone. Don’t overdo it. Don’t color, don’t blow fry, don’t over-wash, etc. Ancient Egyptians braided their hair to give it periods of rest, in a similar style to the cornrows and dreadlocks that we see today. When hair is in a braid it is not as affected by wind and sun damage, and we don’t pick at it or brush it or do anything else that may harm and break it. If you’re having a bad hair day and it’s not time for a wash, just go for a fun braid. Hair should be able to go at least three days between washes, and that includes those of you who sweat on the regular. If you’re outside getting dirty just cover hair with a bandana. I do it all the time.

Don’t stress! Easy for me to say, right? WRONG! I am a person who has been diagnosed with generalized anxiety disorder that has affected almost every area of my life at some point or another. Through a nutritionist-recommended diet, lots of exercise and yoga, as well as bouts with meditation (not medication!), therapy, hypnosis, and acupuncture I have been able to manage my anxiety and I think that you can too. Everyone has stress in varying amounts, and it’s not the easiest thing to manage and may require prescribed chemical interference, but for your hair’s sake and for your HEALTH’S sake, please take every measure possible until you’ve found a way to minimize stress. Change something, do something that makes you happy. YOLO. Find a new perspective.

scissorsFind the right stylist. This requires major emphasis. Your stylist should know that you’re trying to grow your hair out, that you want it to be full and without short layers that can make hair look sparse. Depending on how much hair you have and how thick it is, this will be different for everyone. As long as he or she knows that you are growing your hair and want to take off as little as possible from the ends, and you have been taking great care to minimize split ends that cause breakage, there should not be a problem. As always, stylists must cut hair when it’s dry in order to see what they are taking off and how it will look when you’re out on the town being fabulous.

Marie-AntoinetteDon’t lose your head. Many lose faith when they embark upon years of hair-growing. It’s a lot of extra work and there will be times that you think your hair will look much better if you just cut it short again. The fact is, curly hair looks better the longer it gets if you have the right cut, and like anything, it goes through awkward stages. You’ll go through many of these ups and downs, but as with children, just realize that as long as you’re patient and wait a couple of months it will be totally different. Be sure before you chop, so you don’t find yourself back at the beginning fretting about your hair never being able to grow out! Eliminating breakage using the steps above will make it possible to go longer between cuts so you won’t always feel like you’re taking one step forward and two steps back.

**Good luck and have fun!**

Winter Shminter: Curls in the Cooler Months

Image courtesy of Etsy.

Image courtesy of Etsy.

Now that the cooler temps and dry air are upon us, at least those of us who live in 4-season climates and are currently experiencing fall’s entree to winter, you will start to notice a few small changes in your hair. Here’s how to deal.

  1. It will look a bit more flat and lackluster. Air – Humidity = less frizz, which takes away the added volume in most curly hair. I say most, because the porous quality of our hair is unique. Typically, the tighter the curls, the more porous the hair. Though, if you’re one of those who are blessed with lots of hair strands, it probably won’t look all that much different. Hair is also a bit shinier without added frizz, so that’s nice.
  2. Artificial heat is also drying, and damaging. Now that it will be too cool to breeze out of the house in the morning with still-wet air-drying hair, you will be tempted to use your blow dryer. May I caution you to use this as little a10favorite-jack-o-lanterns possible? The drying effects will mean that you need to do more deep conditioning and oil treatments, which we all know by now is expensive. A better solution, if you can stand it, is to wash hair at night, let it air dry for about an hour, and then sleep with your hair fanned out above your head and over your pillow. It sounds counter-intuitive to sleep on wet hair, but try it. The hair being lifted at the roots and drying horizontally gives added volume and the hair dries disruption-free in its gel caste, leading to smooth, shiny, defined curls.
  3. You will need less product. Now that we’re not fighting frizz on a daily basis, use less product than you do in the summer. This does not apply to conditioner — your hair always needs conditioner. In the fall and winter months, my styling routine is basically this: Condition heavily, wash out most of it, turn head upside down and scrunch in a dime-sized amount of Deva Curl Angell, get out of the shower, dry it gently with a hair towel, and rake a small dab of a finishing product through hair for added protection against the elements. This can be a creme or another type of gel. I like to mix products, it tends to work better than using a lot of one product.
  4. If you’re growing your hair out — it will look weird. This is just what I am currently experiencing, so I’m sharing it with you. I decided last spring to grow out my bangs, so I’m just letting the whole mess grow out on its own to see how long it can get before I hate it. Right now it’s lying pretty limp and lifeless, but when I use dry shampoo at the roots, it looks pretty magnificent. The main thing that annoys me is the long ringlets that have grown to about 12+ inches (in ringlet form) and make it look like I just have a few rat tails hanging down rather than a full bounty of locks. If you’re comfortable with cutting it yourself, you can take one of these longer curls, split it in half or in three sections, and snip off an inch from one of the sections. Making them slightly different lengths can separate the curls and add volume. Remember: Less is more when self-cutting (bad joke). Take off an inch or less at a time. There’s nothing worse than lopping off 5 inches without having realized; and you can always go back for more.
  5. Condition, Condition, Condition!!! I can not stress this enough. Curly hair needs a lot of conditioning. Try to work in one mask or oil treatment a week, especially in these cooler temps. If hair feels dry, leave some conditioner on your ends. *You do not need to buy leave-in conditioner!* Use the stuff you use in the shower. This applies especially to longer-haired peeps. If hair is shorter, scalp oils have less traveling to do to make it to your ends. If your hair is long, it needs some help in that department. Always wash out deep conditioning masks and oils with equal parts lemon juice and conditioner. It’s the best cleanser out there.

Now bundle up and get ready for scarves, sweaters, and hot cocoa! It’s right around the corner…

CQA Interview: Michael

Super-star hairstylist and founder of Hair Room Service Michael Dueñas answers some of Curly Q&A’s hard hitting questions. Dueñas has specialized in curly hair care for years, and I met him when he was working at Devachan in Soho, NYC. He’s found a new creative outlet in the form of his upscale at-home hairstyling business, and his impressive client list includes Lady Gaga, Mariah Carey, Kim Catrall, the lovely Susan Sarandon (one of my favorite curly girls), the cast of Glee, and many more.

michaelCurly Q&A: What is the first thing that you’d tell hairdressers about cutting curly hair?
Michael: Each individual curl pattern is different, and has to be analyzed and cut accordingly.

CQA: What initially interested you about cutting and styling curly hair?
M: It is completely different than straight hair in every aspect, it was a new challenge and curly girls need some serious help!

CQA: What are your favorite frizz-fighting techniques/products?
M: The best way to fight frizz is with moisture! If you style your hair with a moisturizing product, your chance of a frizz explosion is very minimal. Your hair reaches out to the atmosphere for moisture (which causes frizz), so if you provide it with the moisture it needs, it will no longer reach out. The everyday conditioner that you use in the shower is great for controlling frizz! Schwarzkopf Professional BC Moisture Kick Conditioner is amazing for fighting frizz. It gives your hair exactly what it needs!

CQA: What would you say to curly-haired ladies who are unsure about removing traditional and inexpensive sulfate shampoos from their beauty regimen?
M: Sulfates have become so gentle that there is a not a fear if they are in the shampoo.  It was a big band wagon that everyone jumped on before conclusive evidence was brought forward. Some sulfates can actually add moisture!
(Editors note: this is why I’m always encouraging Googling ingredients. Some sulfates, especially those used in inexpensive drugstore brands, will not use quality ingredients in order to keep them cheap. Others are derived from natural additives and are perfectly safe. This applies to chloride compounds as well. Google away!)

CQA: How often should we cleanse our hair, and what do you recommend using to do so?
M: You should cleanse your hair 1 – 2 times a week at the most. The natural oils from your scalp will help to nourish your hair and provide it with the moisture it needs. Using a gentle shampoo, a soft cleanser or even baking soda mixed with water works. You do not want to use anything drying such as a product with tea tree or a volume shampoo.

CQA: How often should curly girls oil treat their hair?
M: Every time you dry your hair. Adding an oil to your pre-dry routine will help to add tremendous amounts of moisture!

CQA: What are your favorite products for curly hair?
M: My favorite products are BC Oil Potion Light, BC Moisture Kick, OSiS Twin Curl, Deva One Condition, and BC Smooth Control Conditioner.

936full-andie-macdowell

CQA: Which celebrity has your favorite curly hair, and why?
M: Andie MacDowell.  She is one of the few who will wear her natural curls without using a curling iron!

CQA: Any other tips for newly converted curly girls?
M: Give yourself a few days to get used to them. The first time you style it won’t be the best, it is always a learning curve! The more you do it, the more freedom from the flat iron and blow dryer you will see! Your hair will get so healthy that you can run your fingers though it while curly! (Editors note: True story.) Curls are fun!

Curly Q&A on Facebook

cqa-fb Like us here! 

There are so many things that I want to say on a regular basis, and not everything is worthy of a full blog post. In light of that, Curly Q&A has entered the 21st century and joined Facebook! Please like my page and keep up on everything new that I and my curly friends have tried, seen, smelled, used, learned, visited; all in relation to wonderful curly hair. I’m a busy bee living in the greatest city in the world and I travel a lot and get to meet all kinds of people, so there’s always something new to share. Go ahead, give us a like, you won’t be disappointed!